Spinning for a project – Use of colour

I am quite keen on making the most of both the time I spend spinning and the fibre I use, to that end I spin most of my yarns with a project in mind.
Hand dyed spinning fibre is a big temptation, but so many spinners are disappointed with how their yarns knit up. Due to; muddied colours, barber pole effects, length of colour repeats, strong striping, dye lot changes, etc. The list is endless.
So I thought I would write some blog posts addressing these issues.

The first issue I thought I would address is the effect on the length of colour stripes when the width of the knitting fabric changes.
Eg. You spin some beautiful yarn from hand dyed top or graduated batts, and proceed to knit a triangular shawl which starts with a few stitches per row and increases to several hundred per row.
The closer you get to the edge the thinner the bands of colour become, to the extent that the edge doesn’t even have stripes.
The effect may be pleasing, or it might not.

To keep the bands of colour more equal make a simple change to the way you prepare your fibre before you start spinning.

Here is an example:
I have 100grams of hand painted top which has repeats of colour along its length and 100grams of hand dyed top which has very little variation in colour.
I plan to spin both lots of fibre and ply them together to form a 2ply.
I then want to use it to knit a large circular shawl, If I work from the top as I received it, without any splitting the resulting shawl with have a large circular of colour in the middle with the bands of colour getting smaller and smaller towards the edge and even mottled at the far edge.
If I want the bands of colour to have a similar width across the diameter of shawl I can strategicly divide the fibre before I start spinning.
For this example I will just divide the fibre for 1 ply and leave the second more solid fibre as is.
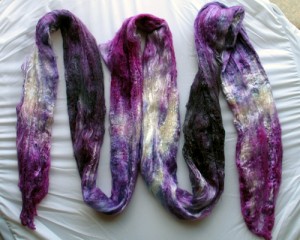
Undivided Top
fig1: Undivided Top

I split the fibre in half length ways as my fibre is a silk brick which is much wider than regular top, so for regular top skip this step or your fibre may be too thin to split further.
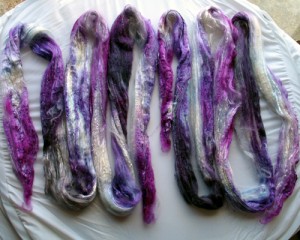
Split in half lengthwise
fig2: Split in half lengthwise
fig2 diagram
fig2 diagram

Next comes the strategic dividing of fibre. I broke the top into 5 fairly equal pieces, you can do this based on the colour repeats in your fibre for best results.
The first piece is not split at all (1). The next piece is split in half lengthways to make 2 thinner strips (1/2). The next piece is split into 3 lengthwise for even thinner strips (1/3). The next piece is split into 4 lengthwise (1/4). The last piece is split into 6 lengthwise (1/6) (I can’t manage to get 5 equal strips so I do 6, I do this by spliting in half, then spliting each into 3.) You can see in the photo the piles of fibre getting thinner from left to right.
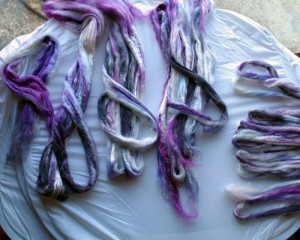
fig3: Strategic dividing

fig3 diagram
fig3 diagram

I then crochet chain the strips of top in order so that they don’t get mixed up before spinning, if you want the colours to follow in sequence make sure you take note of the ‘start end’ and the ‘end end’.
You can see in this picture that the chain goes from fat, to thin and then thinner, the thinnest I rolled into a ball as it would be messy to chain.

fig4: final chained top

When you have spun and plied your yarn you want to use the end with the short colour changes at the small part of your shawl (centre for round shawls) and the slow colour change end will be for the longer edge of your shawl.
For this fibre I will straight 2 ply with the 2nd solid ply, but you could navajo ply for great colour alignment. Or if you are really confident in your dividing skills divide in the same way for both plies for a matched 2ply.
I’ll update this post with a photo of the shawl when its finished.

Triangular Shawl Calculator

Here’s a little way to calculate the maximum number of rows you can work on a shawl (top down shawls only). You need to have knitted at least 20% of your yarn to do get an accurate answer, though it will return a result with more than 10% yarn used.

Triangular shawl
This calculation will work for any shawl pattern that starts at the top and has a consistent number of increases in each row. (ie. 4 increases on every right side row and 2 sts on every wrong side row, or 4increases every other row.)
(Examples of this type of shawl are: ‘Swallowtail’, ‘Ishbel’, ‘Aeolian’, ‘Kiri’, ‘Traveling Woman’, My ‘Dew Drops’ & ‘Danish Ripple’ Shawls)
(I know these shawls have slightly different shapes, but trust me the maths works for all of them.)

You need to know:

Number of Constant stitches in each row: (eg. Swallowtail: 5, Ishbel: 7, Aeolian: 5 or 7.) (usually edge stitches on each side + centre stitch) (If you don’t know this don’t worry too much as it doesn’t make a huge difference to the result.)

Total yarn weight: (This is how much yarn you have available for the project, in grams is best.)

Used yarn weight so far: (This is the total weight of yarn minus what you have left un-knitted.)

Rows worked so far: (with many shawl you can count the number of holes running up the middle next to the centre st and x2).

RESULT
Maximum Number of Rows:

This result is the number of rows you can work with the yarn you have available, it allows you 3rows worth of yarn to cast off which is sufficient for a very stretchy bind off.
If you pattern has a lot of increases in the final few rows, ie lots of yarn over’s for a pointier edge you will need to subtract a few more rows to allow for that.
If your pattern tells you to cast off with the yarn held double you will need to subtract a few more rows to allow for this.

This calculator requires javascript to be enabled.
I hope you find this page useful, I provide it free for everyone, please link to it here.
Contact me through Raverly, or email me if you have any questions.
P.s. Please don’t blame me if the answer doesn’t work out for you, I provide this script working to the best of my knowledge, free to everyone.
(c) Bex Hopkins 2010, please do not attempt to steal this script.
If you would like to know how this is calculated please contact me.

Baby Surprise Jacket by Elizabeth Zimmermann

I recently bought the book ‘The Opinionated Knitter’ by Elizabeth Zimmermann.

For those of you who knit who haven’t heard of EZ, go look her up, she produced some amazing patterns, written in a very simple style, she is no longer alive, but her patterns are still very popular.

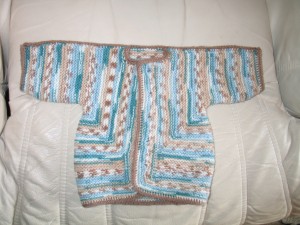
The Baby Surprise Jacket is particually popular and is of a very interesting construction.  (On Ravelry)

So today I have started knitting my first one, from the ‘notes’ in her book.  Its very interesting as it is knitting in 1 peice, but not in the round, the only seams are on the top of the arms (none on the under side of the arms or on the body.

I used the 3 needle i-cord cast off for the shoulder seams, and a i-cord edging for the rest.

First Baby Surprise Jacket

Easy Baby Blanket

I recently knitted an Easy Baby Blanket for a friend who was having a baby. (He was born big and healthy last weekend and both mum and baby are doing well.)

Easy Baby Blanket
Easy Baby Blanket

The pattern is available on the BBC website here.  (On Ravelry here.)
It is a pattern is for a blanket, knitted as a a square starting at the corner, when finished you then knit a lace edging and sew it on.

I used 200grams off DK weight yarn, a full edging all the way around takes about 20% of the yarn.

I am adverse to sewing anything when doing a knitting project, so I made some changes, to enable me to knit the edging on, making for a neater, seamless blanket.

I used a different increase method, a slip stitch edge, knitted the border on with No sewing!

As Follows…

For increases:
Every Row:
Slip 1 purlwise, K into Front and Back of stitch, Knit to last stitch, Knit through back of loop.

For decreases:
Every Row:
Slip 1 purlwise, Slip 1 Knit 1, Pass Slipped stitch over, Knit to last stitch, Knit through back of loop.

This forms 1 stitch on the edge of the blanket for every 2 rows, perfect for attaching the border.

For knitting on the edging, start on a corner, knit the last stitch on the even rows together with 1 slip stitch from the blanket edge.
This will align the edging on the blanket perfectly, without having to measure how much edging is needed and sew it on.

Edging worked as follows:
Cast on 8 stitches
Row 1 ( Wrong side) Slip 1, Knit 1,(Yarn fwd knit 2 tog)twice, Yarn fwd Knit 2 (9sts)
Rows 2, 4, and 6. Slip 1, Knit to last stitch, K last st together with 1 slip stitch from blanket edge.
Row 3. Slip 1, knit 2 (yarn fwd knit 2 tog) twice. Yarn fwd Knit 2 (10sts)
Row 5. Slip 1, knit 3 (yarn fwd knit 2 tog) twice. Yarn fwd Knit 2 (11sts)
Row 7. Slip 1, knit 4 (yarn fwd knit 2 tog)twice . Yarn fwd Knit 2 (12sts)
Row 8. Slip 1, Knit 10 sts, K last st together with 1 slip stitch from blanket edge.
Row 9. Slip 1 Knit 11 sts Row 10 cast off 4 Sts Knit to the end ( 8sts)
These 10 rows form the pattern.

I hope these changes will help anyone who wants to knit this pattern.

First Crochet

My first attempt at crochet (I had one previous attempt, managed 2 stitches and threw the yarn and hook on the floor).  So I’m very proud of this, its a Golden Snitch from Harry Potter (basically a ball with wings).

I however manage to snap the end off the plastic crochet hook in the process, enough said I think.

In other knitting news, my socks blanket is coming along well.

I have knitted some little socks for a friend’s son’s first birthday. I will try and remember to take and post a better picture.

Sock Yarn wip5

Thank you to Clare for some blue sock yarn, this photo is of the little bit, there’s also a whole ball!
ClareL\'s Sock Yarn
(Clare has just started a sock yarn blanket, using DK yarn, its going brilliantly!)

Thank you to Twiglet Queen for some more sock yarn.
Twiglet Queen\'s Sock yarn

I’ve now done about 40squares of my sock yarn blanket, but I won’t post a picture, as it will hopefully be abit more dramatic when I’ve done some more!

I also managed to buy some King Cole Zig Zag 4ply Sock Yarn today, I got it at a wool shop in Wareham. It was £3.99 per ball (100g) which will do a pair of socks with some left over, which is really reasonable compared to some of the other patterning sock yarns. It is 50% Superwash Wool 50% Nylon, but feels nice and soft.
King Cole Zig Zag Sock Yarn

Just to add… I finished this, its an Ipod Cosy, it’s a pressy for Karen, as she was kind enough to give me some of her beautiful Handspun yarn. The yarn was intended for my sock yarn blanket, but it was a bit thick and I was worried it would felt. Karen didn’t know what to knit with it, so I made her a cosy and hopefully there is enough left for a little phone cosy or purse for me.
Karen\'s Felted Ipod Cosy

Sock Yarn Blanket wip4

I managed to do 4 squares from the donations of yarn I received last night, and there will be many more!
I finished my first big square (counting as 4 squares), taking the running total to 22 (+ the 1 lost in the sofa…).

From bottom right, Grey-Light Brown is from Katrina’s yarn, Brown-Black and Cream are from Bea’s Yarn, Blue-Green is from Tanya’s yarn.


Tonight I’m going to try and do some of my Stained Glass Fan Bag which I really want to get finished so it can be my knitting bag 🙂

Sock Yarn Thank you

Thank you to the SnB’s for their very generous donations towards my sock yarn blanket, I think I will have to knit faster! I’m so pleased with the variety and colours, as I tend to buy the same sorts of colours all the time.


Thank you to Karen for her beautiful handspun wool, this is quite thick compared to the yarns I have already for the blanket, so I might do the squares with fewer stitches and see how it comes out, or I might have to make Karen a small and pretty gift.


Thank you to Bea for her cream with bright specs sock yarn and cream-brown-grey with red specs sock yarn. I think the darker one will knit up especially nicely, I might do this at a make square to take advantage of the colour changes.


Thank you to Katrina, who I met for the first time this evening, for her blue regia sock yarn and pinky-beige, green, brown sock yarn, I’ll really interested to see how the latter patterns when knitted.
As promised I will try and type up my version of that pattern for you. 🙂


Thank you to Tanya for her blue-green-purple regia sock yarn, which is the leftover from her first sock.


Looking at this large pile of wool, which has kindly been given to me, I feel the urge to go away and knit a square from each and add it to my blanket.

Thank you to everyone for their kind comments about my hand made bamboo needles, I hope you enjoy them and welcome your feedback.

Sock Yarn Blanket wip2

I’m now knitting square 7, I love this project so much!

Thanks to the Bournemouth SnB’s who have offered me leftovers, I’m really looking forward to seeing the different selection of yarns and how they knit up!
I can definitely see myself buying sock yarn to make socks, so that I have different left overs!

Quick Update Re: Colourful Designs Shop Hopefully I will be adding some knitting needles in about 2 weeks time!

Sock Yarn Blanket wip1

I’m starting a blanket made out of scrap sock yarn. I’m in love with hand knitted socks and the beautiful yarns.
So I’m going to use the remnants I have, and any I receive from others to make this blanket.

My reasoning behind this project is…
I have a condition called Fibromylgia syndrome, it causes me to have chronic pain over most of my body most of the time, the pain doesn’t respond well to treatment, so most of the time I just have to put up with it. Among other things it makes it very hard for me to sleep and I get cold limbs.

So I tend to spend a lot of time sitting in a chair, instead of in bed, and to pass the time I knit, as I don’t have the energy for much else. I have numerous blankets which I have tried to keep me warm, but they are all so heavy they make my legs hurt more.

So… I want to knit a warm but lightweight blanket, that is just the right size for me. I did start one, but the plain blocks of colour drove me to boredom and it has since hibernated. I have recently fallen in love with knitting socks and beautiful sock yarns and I thought that a sock yarn blanket, where I can knit little bits at a time would be brilliant!

If you’d like to give me your sock yarn remnants place email me. (Anything 4ply with some wool in it would be brilliant, any colours.)

Re-Launch

Today is the re-launch of The Colourful Designs Shop!

We are now stocking various knitting accessories and there will be lots more to come. If you do want any custom items based on any items I used to sell then just email me.

So go and have a look, the selection is quite small at the moment, but I will be doing an update at the weekend with some more additions.

Here’s a sneak preview…
Knitting Pins/Broach

Knitting Accessories