I decided that for the Baby Surprise Jacket by EZ to be the perfect baby gift, it needed something to go with it, so I searched ravelry and didn’t really find anything with the same mitred styling.
So I am going to design and knit some Baby Surprise Trousers, with the same mitred styling and knitted in 1 piece! I have the pattern in my head and I think it works, but I need to cast on and knit through any problems, before giving any more details.
I recently bought the book ‘The Opinionated Knitter’ by Elizabeth Zimmermann.
For those of you who knit who haven’t heard of EZ, go look her up, she produced some amazing patterns, written in a very simple style, she is no longer alive, but her patterns are still very popular.
The Baby Surprise Jacket is particually popular and is of a very interesting construction. (On Ravelry)
So today I have started knitting my first one, from the ‘notes’ in her book. Its very interesting as it is knitting in 1 peice, but not in the round, the only seams are on the top of the arms (none on the under side of the arms or on the body.
I used the 3 needle i-cord cast off for the shoulder seams, and a i-cord edging for the rest.
From 200grams of Organic Merino ‘Tea and Roses’ Club fibre to 600m of handspun yarn to 4ft6 Swallowtail shawl.
2ply yarn, spun worsted on my Ladybug, final yarn between 4ply and sport weight.
I only got my first wheel in January this year, and I managed to spin, ply, knit and block this shawl in just 13days, as part of my Tour de Fleece spinning challenge.
I recently knitted an Easy Baby Blanket for a friend who was having a baby. (He was born big and healthy last weekend and both mum and baby are doing well.)
Easy Baby Blanket
The pattern is available on the BBC website here. (On Ravelry here.)
It is a pattern is for a blanket, knitted as a a square starting at the corner, when finished you then knit a lace edging and sew it on.
I used 200grams off DK weight yarn, a full edging all the way around takes about 20% of the yarn.
I am adverse to sewing anything when doing a knitting project, so I made some changes, to enable me to knit the edging on, making for a neater, seamless blanket.
I used a different increase method, a slip stitch edge, knitted the border on with No sewing!
As Follows…
For increases:
Every Row: Slip 1 purlwise, K into Front and Back of stitch, Knit to last stitch, Knit through back of loop.
For decreases:
Every Row: Slip 1 purlwise, Slip 1 Knit 1, Pass Slipped stitch over, Knit to last stitch, Knit through back of loop.
This forms 1 stitch on the edge of the blanket for every 2 rows, perfect for attaching the border.
For knitting on the edging, start on a corner, knit the last stitch on the even rows together with 1 slip stitch from the blanket edge.
This will align the edging on the blanket perfectly, without having to measure how much edging is needed and sew it on.
Edging worked as follows:
Cast on 8 stitches
Row 1 ( Wrong side) Slip 1, Knit 1,(Yarn fwd knit 2 tog)twice, Yarn fwd Knit 2 (9sts)
Rows 2, 4, and 6. Slip 1, Knit to last stitch, K last st together with 1 slip stitch from blanket edge.
Row 3. Slip 1, knit 2 (yarn fwd knit 2 tog) twice. Yarn fwd Knit 2 (10sts)
Row 5. Slip 1, knit 3 (yarn fwd knit 2 tog) twice. Yarn fwd Knit 2 (11sts)
Row 7. Slip 1, knit 4 (yarn fwd knit 2 tog)twice . Yarn fwd Knit 2 (12sts)
Row 8. Slip 1, Knit 10 sts, K last st together with 1 slip stitch from blanket edge.
Row 9. Slip 1 Knit 11 sts Row 10 cast off 4 Sts Knit to the end ( 8sts)
These 10 rows form the pattern.
I hope these changes will help anyone who wants to knit this pattern.
I’ve been playing with fractal spinning the last few days.
This is a draft tutorial and needs more information and images.
What is fractal spinning?
Well it is method of spinning, it works best with tops which have been painted with stripes (there are alternatives, but I will ignore them here for simplicity).
The principal is to create a yarn where the plies have different lengths of colour repeat. This is achieved by dividing the top lengthways.
This method shows how to create a 2ply yarn, though the theory can be applied for 3plies.
It works best with tops that have a regular colour repeat, 3 colours works well. This example has only 2 colours.
Starting off with 1 length of continuous top (this is Superwash Merino from ColourflDesigns.com), we want to spin all the tops in the same direction, so we need to make a note of the end. I will be spinning from the end with the longer yellow stripe (top of photo).
Fractal Step 1 - Undivided Top
Split the top along its length being carefuly to keep both peices equally, providing you with 2 lengths of top that are half the width of the original.
You now have 2 lengths of top that are thinner, remember the end to spin from (bottom left of both peices in this picture).
Fractal Step 2 - First Divide
1 of these will become the first ply for your yarn. The 2nd needs to be split again length ways, making 2 equal thinner strips. Remember which end you are spinning from. In the image below: Left; Top for first ply (spinning end is bottom left), Right; Top for second ply, 2 thinner lengths (spinning end is bottom length of both peices).
Fractal Step 3 - Final Divide
You may want to roll these into a ball, or pre draft by attenuating them if you wish, but this may cause the colours to blend together, disrupting the striping.
When you spin each of the plies, the first ply will have long colour repeats, (in the image above the 1st ply will have 9 long colours repeats of yellow, purple), the 2nd ply will have shorter colour repeats (in the image above the 2nd ply will have 18 shorter colour repeats of yellow, purple).
Making sure you spin the tops from the right end will meake sure you get matching colour repeats aong the length, and when you ply you should ply from the same end of each single.
The effect will be a yarn with slow colour changes over laid with faster colour changes, making a really interesting colour blend effect. Where both plies are the same colour you will get a solid section, but other sections will be blended. If you are using more than 1 length of top for a larger garment follow the same steps and identify the same starting end if possible (this is easier when 3 or more colours are present).
I will post more pictures of the finished yarn and a knitted item when its finished. It works well for socks!
I did some dyeing today, here are some pictures. I’m going to use the Pansy colourway to try some fractal spinning.
Superwash Merino, still wrapped in clingfilm sausage after dying in Moss colours.Shetland and BFL humbug next to each, spiral dyed Red -> Yellow, still wrapped in clingfilm.The moss and Spiral dyed fibre hanging up to dye.Superwash Merino in Pansy colourway. I ran out of blue dye (and thus Purple) so the second lot is paler purple.
For those of you who may be interested this is where I do my dyeing.
I have updated the blog software and things seem to be running smoothly again, so I should be able to post frequent updates with photos again.
I’m going to join in with the Tour de Fleece, which takes place during the Tour de France; bicycle wheels, spinning wheels, you get the jist! So I will hopefully get lots of spinning done!
Sorry I have been so lax about updating, I will try and update more! It is mainly because my camera has given up the ghost, but after 9yrs of good service I can’t complain too much. I haven’t settled on a new one, so my picture taking is abit dis-joined at the moment, and I like to include photos in my posts.
So I thought I would update and add the photos in later.
I ordered myself a loom this week, so have tried that out today, its fun and eats yarn quickly! I want to use it to make a blanket and use up all the novelty yarns that have accumulated in my stash box.
I have been spinning lots recently and enjoying new fibres, dfferent sheep wools, alpaca, tencel, silk, etc..
I am really enjoying hand dyed colour ways, the way the colours play across the knitted fabric.
This a shetland Capelet made with handspun yarn (fibre from Wildcraft), Nahajo plying always the colours to slowly stripe.
Shetland Seascape Fibre From WildcraftShetland Seascape YarnShetland Seascape Capelet
Superwash English Wool Blend from Wildcraft, Navaja plied for striping yarn, this will be a tank top for Em.
Superwash English Wool Blend 'Pinks' from Wildcraft
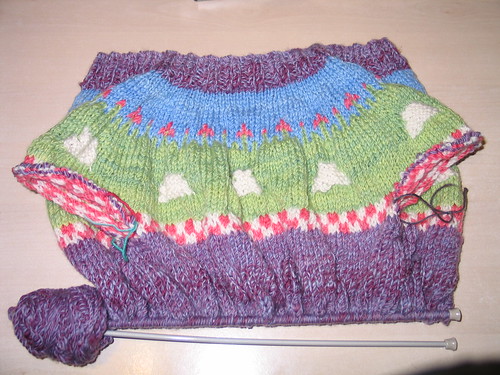
Well I had hoped to post a lovely picture of the yoke which I have finished and am now working on the main colour. But my faithful camera of 8 or 9 yrs has given up, every memory card I put in it just says card error. So a new camera is on the cards, wouldn’t have minded if I had wanted a new one, but the old one worked perfectly and despite being dated I really liked it.
Here is the picture of the work so far. The sheep need faces and legs! You can see the stitches held on spare yarn at each side.
I have now started on the sleeves, even though I haven’t finished the body, as I haven’t decided if I want to add any colour work to the bottom of the body, so I thought I would do the sleeves then assess how much yarn I have left when they are done.
Sleeves: Using main colour Pick up 3 sts from Cast on in arm pit and knit 44sts on holding yarn.
Work 1.5inches in Main colour, decrease 2 st at sleeve ‘seam’, and every 3inches, until 41sts remain.
Work straight until sleeve measures 8.5inches from arm pit.
Work colour and ribbing, then cast off.
Repeat for second sleeve.
I have got back to knitting some squares for my sock yarn blanket this weeek too, so its growing again, I think it might be ready for next winter. The more I do of it, the more I love it and the more I want to give it to Emily, I feel its something she could grow up with and keep for the rest of her life. But I still really want it for myself, as it fels so nice over my lap, light and warm.
Before working the flowers, work 4 more rows in blue and more increases (2sts per section).
I am aiming for 236sts at the bottom of the yoke. Calculation: {28(chest inches)x5.5(sts per inch)}+ {8(sleeve width inches[same as original]) x2 x 5.5(sts per inch)} = 242. The original pattern doesn’t have additional stitches under the arm, I am going to add 3sts under each arm to improve drape and fit. Therefore 242-6 = 236.
Work as per the pattern rows 7-12 (including the increases in row 7) for the flowers and grass, placing the flower repeat ever 8st.
If you find carrying the yarn floats hard, you can work rows 9-10 and 11-12 using the mosaic knitting (slip stitch) method (Have a read of this helpful Knitty article). But basically you work the stitches for 1 colour for 2 rows, slipping the stiches for the 2nd colour, then work the 2 rows again knitting the 2nd colour and slipping the first colour.
Work rows 13-16 as per the pattern. (166sts)
Work 2 rows with 2 increases per section in the first row. (182sts)
Work rows 17-22 as per the pattern, placing sheep evenly around the yoke.
Work as pattern rows 23-32, including colour checks.
Working with main colour as pattern increase 3 sts per section in the following row (each section now has 27sts). Total stitches (27×8 + 6 + 8 + 8) = 238sts.
Work 37sts, place next 44sts on holding yarn for sleeve, cast on 3sts (for underarm), work 76sts, place next 44sts on holding yarn for sleeve, cast on 3 sts (for underarrm), work remaining 37sts.
The pictures I took mid process seem to have disapeared off my mem card (that’s what you get for using a camera with memory card thats 8yrs old and has probably exceeded its max write cycles!).
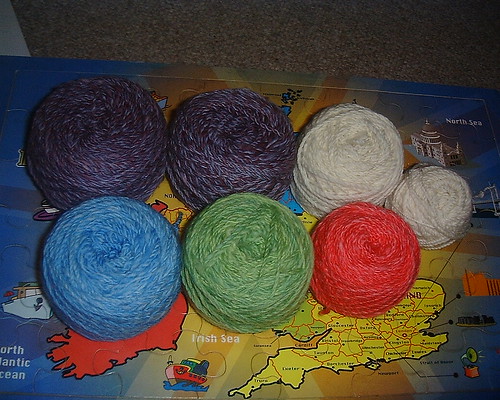
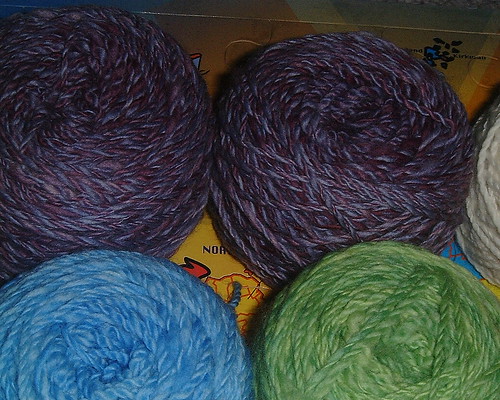
So here are the pictures of the finished yarn cakes.
In the next picture hopefully you can see the 2tone 2ply for the main colour, and the variagation in the grass green and sky blue.
I spun the singles, have of each colour first, then the second colour, to help improve consistency. Then plied and skeined it all. I have washed and finished it all, but now have to wait for it to dry before I can wind it into balls.
I haven’t measured the yardage so fingers crossed.
I choose lilac solid and mauve/purple with some variation, for the main colour, I have made a 2 tone 2 ply yarn with it, and am really pleased with how its come out. As long as there is enough, as I doubt I would be able to make a good dye repeat of this.
In other news I have been preparing some batts for the shop, as well as some orifice hooks and some stitch/row markers. I had planned to do an update this afternoon, but have run out of steam, so it will either be mid week, or next weekend. Sorry.
As a spoiler…
There are some Sock Batts Merino/Nylon in colourway ‘Fire’, Ladybug orifice hooks, and simple stitch/row markers in various colours.